Use DigitalOcean as Dynamic DNS
I have a server at my home on which I host various test projects and I needed a dynamic DNS service as my ISP assigns me an IP dynamically. Tried some dynamic DNS services, but their domain names tend to get long, and I don't like typing URLs. So I decided to buy a domain and handle the DNS update myself.
What we'll do is a script that finds out what our IP is and then reports it to DigitalOcean. This script will run at a specified interval on our server.
For this you'll need a UNIX machine, a DigitalOcean account and a domain pointed to DigitalOcean's Nameservers.
To see how to point your domain to DigitalOcean check this article or check with your domain's registrar on how to do it, as it varies from one to another.
Also, we'll use cron in this tutorial, so if you're not familiar with it please read this tutorial before.
I will not cover in detail what needs to be done on DigitalOcean's side, as their documentation covers it already. I'll just list the steps needed along with the links in their documentation:
- Generate an access token
- Create a project
- Add domains to the created project
- Add at least one
Arecord to your DNS records.
In my case, I added two A DNS records:
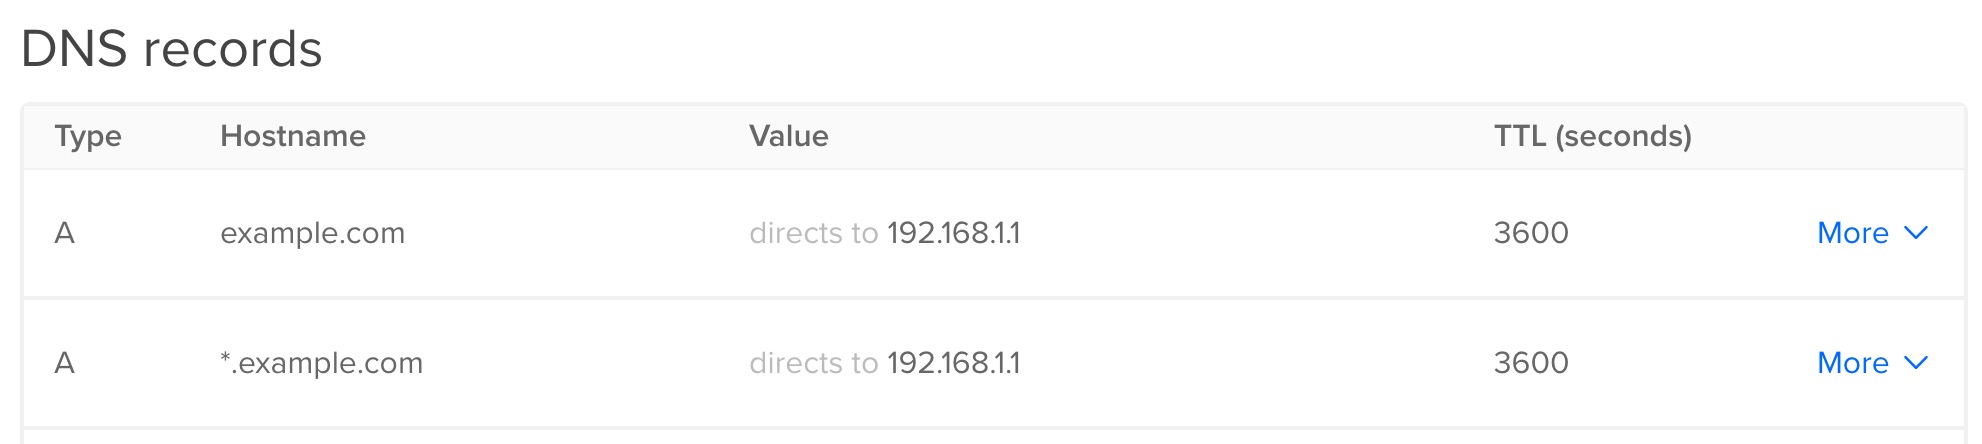
The first one is the required one and will point example.com domain to my machine. The second one will point all sub-domains of example.com (like test.example.com) to my machine.
For the first one enter @ in the Hostname field when you create the record, and for the second one enter *. As for the IP, it doesn't matter what you enter as it will be automatically updated later by our script.
This should be all that you need to do on the side of DigitalOcean.
Now let's write a bash script that will update DigitalOcean's DNS records with our IP.
Create a file called update-dns.sh with the following contents:
#!/bin/sh

ACCESS_TOKEN=#YOUR_TOKEN
DOMAIN=#YOUR-DOMAIN
RECORD_IDS=#(RECORD_ID_1 RECORD_ID_2 RECORD_ID_n)

IP=$(curl -s http://checkip.amazonaws.com/)

for ID in "${RECORD_IDS[@]}"
do
  curl \
    -fs -o /dev/null \
    -X PUT \
    -H "Content-Type: application/json" \
    -H "Authorization: Bearer $ACCESS_TOKEN" \
    -d "{\"data\":\"$IP\"}" \
    "https://api.digitalocean.com/v2/domains/$DOMAIN/records/$ID"
done
After you created the file, let's give it execution rights by executing the following in your terminal:
chmod +x update-dns.sh
Now let's go step by step and see what we need to change and what the script does.
The things we need to change are at the top of the file. We'll start by changing line 3 where we need to add the access token that we generated above in step 1 on DigitalOcean. Should look something like this:
ACCESS_TOKEN=3u2c62u1z51j7djilw58wt04220vqbuzud6z5o2xahz4k8ufxj7eejg2w2trjxma
The next thing to change it's pretty straightforward: at line 4, set the domain for which to update the DNS records. In our example, this is example.com.
DOMAIN=example.com
Lastly, we'll need to tell our script what are the ids for the DNS records. For this, we'll use this little script to list all our DigitalOcean DNS records for our domain:
#!/bin/sh

ACCESS_TOKEN=3u2c62u1z51j7djilw58wt04220vqbuzud6z5o2xahz4k8ufxj7eejg2w2trjxma
DOMAIN=example.com

response=$(curl \
  --silent \
  -X GET \
  -H "Content-Type: application/json" \
  -H "Authorization: Bearer $ACCESS_TOKEN" \
  "https://api.digitalocean.com/v2/domains/$DOMAIN/records")

echo $response | grep -Eo '"id":\d*|"type":"\w*"|"data":".*?"'
At the top of this script, just change the ACCESS_TOKEN and DOMAIN to match our initial script.
The output of this script will be groups of three key/value pairs: the id of the record, the type of the record and data, which is the value of the record.
This is the output for our example:
"id":76145669
"type":"SOA"
"data":"1800"
"id":76145670
"type":"NS"
"data":"ns1.digitalocean.com"
"id":76145671
"type":"NS"
"data":"ns2.digitalocean.com"
"id":76145673
"type":"NS"
"data":"ns3.digitalocean.com"
"id":76145698
"type":"A"
"data":"192.168.1.1"
"id":76145705
"type":"A"
"data":"192.168.1.1"
From this, we only care about the id of our A DNS records. From the above output, we can determine that those IDs are 76145698 and 76145705. So we change our initial script accordingly:
RECORD_IDS=(76145698 76145705)
Our DNS update script should be looking like this:
#!/bin/sh

ACCESS_TOKEN=3u2c62u1z51j7djilw58wt04220vqbuzud6z5o2xahz4k8ufxj7eejg2w2trjxma
DOMAIN=example.com
RECORD_IDS=(76145698 76145705)

IP=$(curl -s http://checkip.amazonaws.com/)

for ID in "${RECORD_IDS[@]}"
do
  curl \
    -fs -o /dev/null \
    -X PUT \
    -H "Content-Type: application/json" \
    -H "Authorization: Bearer $ACCESS_TOKEN" \
    -d "{\"data\":\"$IP\"}" \
    "https://api.digitalocean.com/v2/domains/$DOMAIN/records/$ID"
done
As for what the script does:
IP=$(curl -s http://checkip.amazonaws.com/)
The above gets your current IP using an Amazon AWS service. For alternative services, you can consult this list on OpenWRT.
for ID in "${RECORD_IDS[@]}"
do
  curl \
    -fs -o /dev/null \
    -X PUT \
    -H "Content-Type: application/json" \
    -H "Authorization: Bearer $ACCESS_TOKEN" \
    -d "{\"data\":\"$IP\"}" \
    "https://api.digitalocean.com/v2/domains/$DOMAIN/records/$ID"
done
The above will call the DigitalOcean API for each record id that you have defined at line 5, as documented in DigitalOcean's API documentation.
You can now give it a quick test to see if it works as intended. Execute the script in your terminal by typing ./update-ddns.sh. If it worked correctly, you should now see the DNS records updated on DigitalOcean.
Seeing the script works, we can set it as a cron job so it will update the DNS every 20 minutes.
Adding the following line in your crontab will do just that:
*/20 * * * * /path/to/update-dns.sh
And just like that we have our own dynamic DNS system up and running.
Alternatively to the cron solution, if you have an Asus router and you can run Asuswrt-Merlin firmware on it, you could set the DNS update script to be executed by the router every time your IP changes. Please see their docs and the adaptation of our script to achieve this.
Others routers should support this, so check your router's manual to see if you can set up a custom dynamic DNS script on your router.
Hope this helps ✌️